How to Jump Rope: First Bounce, Timing and Common Mistakes
Learn a controlled first jump-rope bounce, connect one turn at a time and troubleshoot extra hops, wrist action and rope catches without forcing the pace.
To jump rope, bring the rope forward from behind your heels, make a small two-foot jump as it approaches your feet, then land under control. Begin with one turn and a deliberate stop. Connect the next turn only when the first feels manageable.
This lesson builds the basic forward bounce with a conventional single-person rope. The first goal is a repeatable clearance and a calm finish, not a long streak. If jumping and landing without equipment is uncomfortable or uncertain, get suitable individual guidance before adding the rope.
Follow the rope through one turn
| Stage of one turn | Rope position | What the feet do |
|---|---|---|
| Ready | Still behind the heels | Stand settled; hands near their starting position |
| Turn begins | Travels behind the body and overhead | Wait for the approach; starting the hands is not the jump cue |
| Approach and clearance | Descends in front and reaches the feet | Use the small two-foot bounce so the cord passes beneath |
| Finish | Turn stops and the cord settles | Land under control; step clear only once the cord stops |
Keep the count explicit: a basic single-under is one turn with one jump; an unwanted double bounce adds a hop within a turn; a double under puts two rope passages into one jump. Once the basic bounce is repeatable, controlled footwork after the basic bounce is a separate lesson.
How to start jumping rope
Check the cord and handle connections, then choose a stable surface with room above, behind and beside you for the complete rope path. Keep people, pets, bags and furniture clear. The floor and space guide covers that setup in more detail.
Stand upright with your feet comfortably close and your gaze ahead. Hold one handle in each hand with a secure, relaxed grip. Let your elbows bend naturally, hands around hip height and slightly out from your sides. Compare both hands: neither should be much higher or farther away. Rest the middle of the rope behind your heels.
Keep the position comfortable as the rope starts moving. Compare your hands with their starting height and spacing, and reset if one lifts or moves farther out. Avoid squeezing your elbows against your ribs or copying a rigid pose; work on a controlled turn before adding another jump.
Rehearse the bounce without a rope
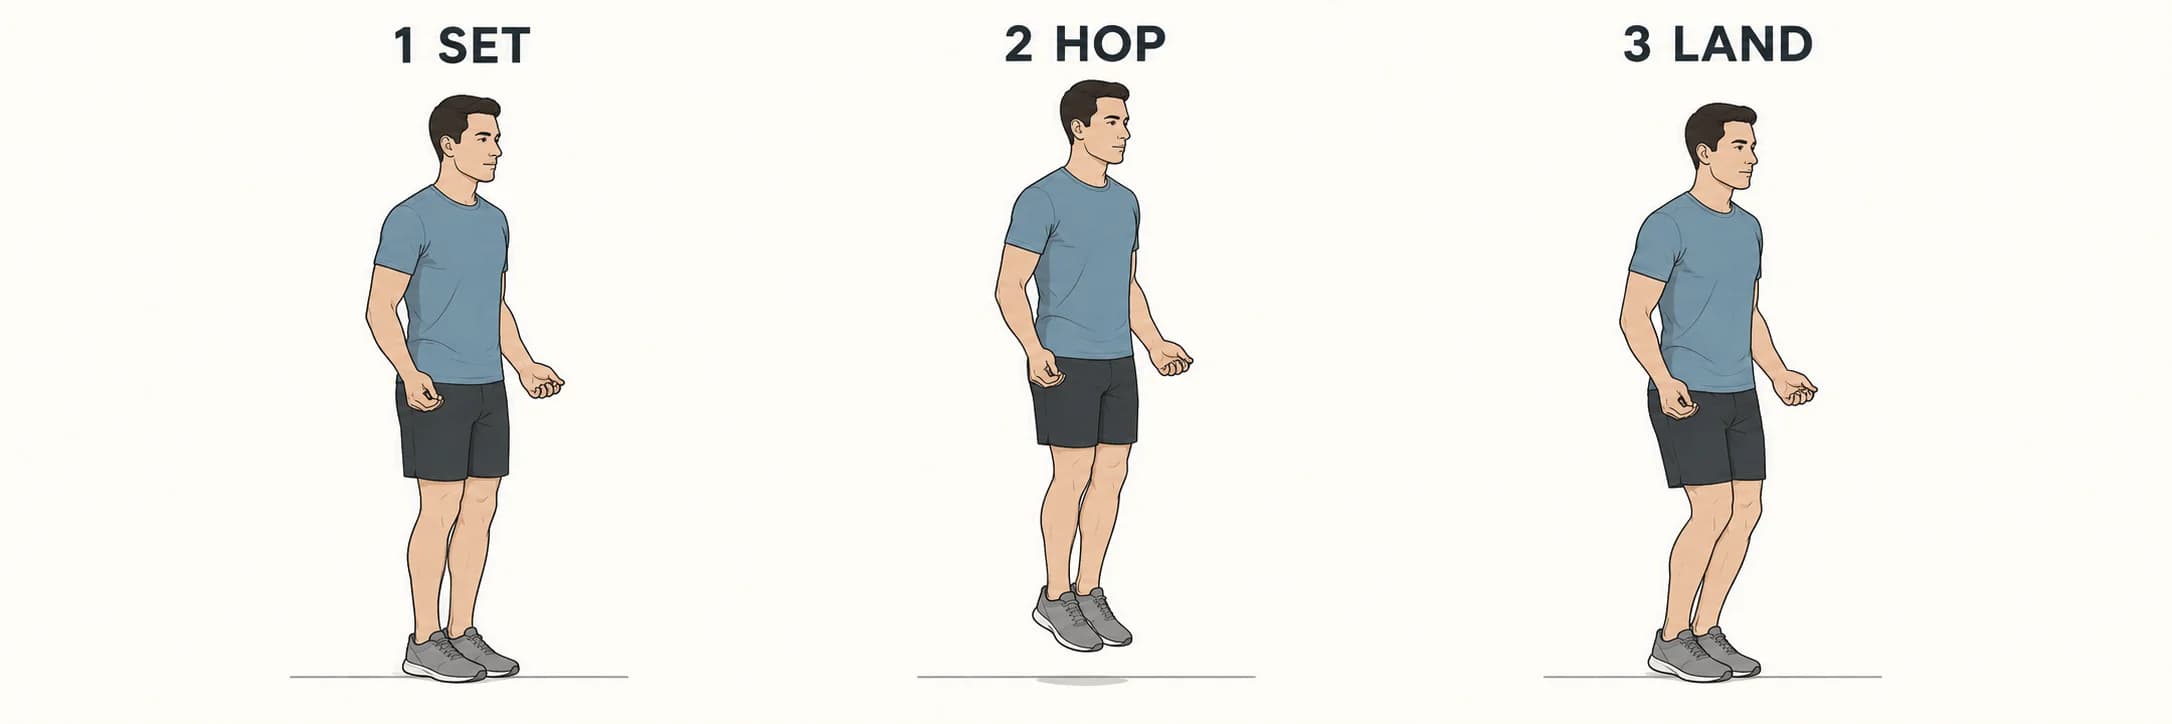
Set the rope safely aside. Make a small two-foot hop and land close to where you started, with relaxed knees. Stay comfortably upright rather than folding toward your toes. Avoid drawing your knees high or kicking your heels backward to create clearance.
Try another only when the landing feels controlled. A quiet landing is a useful cue, not a sound test or proof of a particular force. No fixed jump height or cadence is needed for this rehearsal. Buddy Lee's preparation sequence introduces takeoff and landing without the rope before combining the actions; this is our simplified practice breakdown.
One turn, one jump, then reset
- Return the rope behind your heels and settle your hands near their starting position.
- Start a smooth forward turn. The cord travels behind you, overhead and down in front; do not jump merely because your hands have started.
- As the rope approaches your feet, make the small two-foot bounce you rehearsed and let it pass beneath you.
- Land, stop turning and let the rope settle. Step clear only after it stops; do not trap a moving cord to force a finish.
If the rope catches, stop and untangle it while stationary. Reset before changing one feature on the next attempt. The turn-and-stop task lets you notice whether you jumped before the rope arrived, waited too long or changed your hands as it approached. It is a learning task, not a workout dose.
When one clearance feels predictable, keep the hands turning smoothly through the landing and meet the next approach with another small jump. Finish deliberately after that second clearance. If it becomes rushed or confusing, return to the single turn rather than adding more attempts to the same tangle.
Understand the jump rope double bounce
An unwanted double bounce in ordinary single-under practice is an extra hop between rope clearances: two bounces during one revolution. A double under is different: the rope passes beneath the feet twice during one jump. This lesson aims for one jump per turn, not double unders.
Listen or watch for the extra landing while the rope is away from your feet. A high first jump, hesitant turn or habitual rebound may contribute; none is certain from the name alone. Rehearse one controlled landing without the rope, then make one turn and stop. Keep the knees relaxed rather than locking them to prevent the extra hop.
Next, connect two clearances with a continuous turn and one jump for each approach. Avoid pausing the rope overhead while waiting for your feet. If the extra hop returns, simplify again. The useful change is the relationship between turn and jump, not forcing a faster tempo.
Jump rope wrist rotation without windmilling
Use a comfortable, compact hand-and-wrist action with relatively quiet upper arms. Keep the grip secure while the hands guide a smooth turn. Avoid locking the arms rigidly or forcing a large wrist circle; reset the movement if the handles rise or spread as the rope approaches.
With empty hands near hip height, rehearse a comfortable small forward turning gesture. Then try one real turn and compare where the hands finish. If they rise, spread apart or become uneven, reset that one feature. Keep a secure grip without clamping harder as the rope approaches.
Maintain the same simple two-foot bounce while working on your hands. Adding a new foot pattern at the same time makes the result harder to interpret. A jammed handle or damaged connection needs equipment attention, not a stronger wrist action.
If your jump rope keeps hitting your feet
| What you notice | Check next | One possible adjustment |
|---|---|---|
| You land before the rope arrives | Did you jump as the hands started? | Meet the later approach instead of leaving immediately. |
| Contact occurs as you take off | Timing and whether the loop stays even | Try beginning the bounce slightly earlier within a smooth turn. |
| One shoe catches repeatedly | Hand height, spacing and foot separation | Reset roughly even hands and a simple two-foot bounce. |
| First clearance works; second fails | Hands pausing or an extra hop appearing | Keep the next turn continuous; shorten the sequence. |
| Feet kick back or drift | Landing position and jump shape | Rehearse a small upright bounce without the rope. |
A short side recording can clarify timing; a front view can reveal hand drift. Place the camera and any observer outside the full rope path. Change one thing, compare the result and return to the last controlled action if it gets worse.
Surface contact and fit can also matter. Use the rope-length guide for a separate equipment check. Do not cut a cord because of one failed jump, or solve every catch by jumping higher.
Equipment for beginner practice
Start with a rope you can turn smoothly, stop deliberately and adjust according to its instructions. Handle weight and cord weight describe different things, and shipping mass does not identify the load being rotated. Added load does not replace timing practice. Use the rope-selection guide for construction and product comparisons, then keep this lesson focused on a controlled first bounce.
Choose a manageable rope with understandable fitting instructions. A mat is a separate space decision: the PBGGAME oval mat is one option whose footprint and backing compatibility need checking against your floor. It is sold separately from the rope and cannot correct double bouncing or hand drift.
From practice to a beginner jump-rope workout
Finish while you can still land and stop deliberately. Stop for pain, dizziness or loss of control. Once the basic action is repeatable, use the beginner workout guide to organize exercise separately from this skill lesson. A successful first sequence can be short: steady hands, one clearance per turn and a controlled finish.