Core Training at Home: Bracing, Anti-Rotation and Controlled Movement
Choose core training by the task: resist a turn, move limbs with a steady trunk or control rotation. Compare band and bodyweight versions with a printable cue sheet.
Core training at home can involve resisting a turn, keeping the trunk steady while a limb moves, or deliberately controlling rotation. Resistance band core exercises can practise those different tasks, but their instructions should not be mixed. A Pallof press resists turning; a wood chop may intentionally include a turn. A dead bug adds a separate floor-based control task.
Choose the task and the setup you can repeat before adding equipment or more variations. You can start with a bodyweight movement when an external anchor is unavailable. The aim here is controlled practice, not the hardest-looking position, a guaranteed change in waist size or a treatment for back pain.
Keep the core-control cue and record sheet beside the task you choose. Equipment is a condition for a particular version, not a requirement to add a band or progress to a wheel.
Three core tasks, three different success checks
| Task | Example / success check | Support or equipment needed | Without that condition |
|---|---|---|---|
| Resist rotation | Pallof press: hands move forward while trunk faces ahead | Approved side band attachment and compatible setup | Choose the separate bodyweight dead bug if suitable; it is a different task |
| Retain trunk position as limbs move | Dead bug: manageable reach without increasing arch or rib lift | Bodyweight version needs a suitable floor; held-band version separately needs its approved attachment and controlled entry | Use the unbanded version; no band or wheel is required |
| Control intended rotation | A defined chop with a deliberate turn and return | The specific band, cable or ball arrangement for that version | Read the distinct chop setup choices; omit a version whose equipment or turn is not suitable |
No verified anchor narrows the equipment choices; it does not rule out floor-based bodyweight practice. A side anchor may suit a Pallof press, while a held-band floor setup needs a clear path behind the head and controlled entry and exit. Use the band setup guide to separate installation from the exercise itself.
Band Pallof press: let the arms move while the trunk resists turning
Catalyst Athletics’ band Pallof press uses a side attachment around shoulder height, hands at the chest and a slow forward press while resisting rotation. The exercise direction does not establish an approved connection, support rating or stretch limit for the equipment you own.
- Establish the compatible side attachment, inspect the band and stand side-on in a comfortable stable stance. Begin with manageable tension and the hands together at the chest.
- Press a short distance straight forward while retaining the direction of the chest and pelvis. Keep the hands from drifting sideways toward the attachment.
- Pause only while the position and breathing remain controlled, then return the hands to the chest. Longer reach is optional, not the first goal.
- Unload before turning or changing sides. Re-establish a comparable arrangement with the attachment on the opposite side.
If the chest turns toward the anchor, reduce demand or shorten the forward reach. If the body leans away, reset the stance and tension instead of making the lean part of the exercise. A narrower stance, longer hold and stronger band are separate changes; adding all three makes the comparison unclear.
Keep enough control to breathe rather than turning a short press into a breath-holding endurance test. Stepping farther away changes the elastic stretch as well as the feel. Check the actual band’s limits instead of using another person’s distance as a measurement for your room.
Bodyweight dead bug: learn the opposite-limb sequence
NASM’s bodyweight dead bug begins lying on the back with arms toward the ceiling and hips and knees bent about 90 degrees. One arm moves toward overhead while the opposite leg reaches outward; return before alternating. Keep the head and trunk supported and avoid adding a larger back arch to obtain more reach.
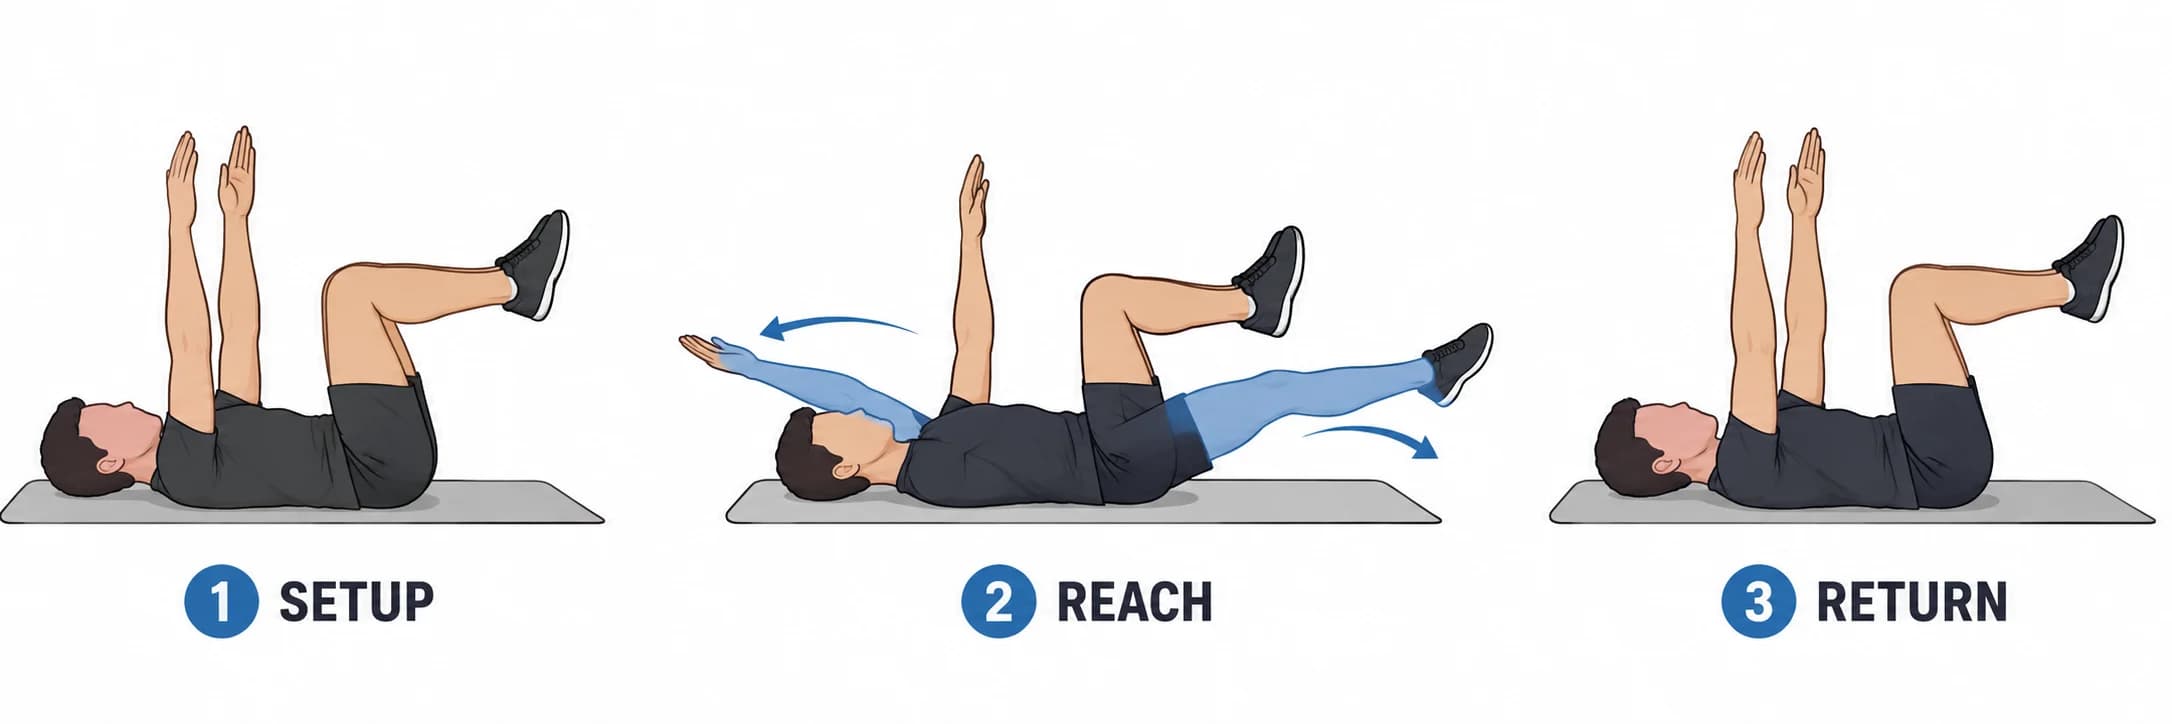
The illustration is a movement sequence, not a required reach distance. Begin with a small range you can control. A shorter leg reach with a more bent knee can be used as an easier editorial rehearsal; a heel almost touching the floor is not a pass mark. Do not force a maximal flattening of the back or lift the head to watch the legs.
If the ribs rise or the back position changes, shorten the movement and slow down. If you cannot keep breathing through the chosen range, reduce the demand. Treat the return as part of the repetition rather than rushing through it to reach the other side.
Band dead bug pulldown: hold the arms as a leg moves
A band dead bug pulldown has a different arm task from the bodyweight sequence above. Rehab Hero’s Band Pull Dead Bug establishes a held band pull with the arms aligned around the shoulders while one leg extends at a time. The arms hold their position; they do not alternate overhead or repeatedly pull down toward the hips.
- Set the floor area and the actual approved band attachment before taking tension. Keep the path behind the head clear of the face, neck and abrasive edges. Plan how to reach, lie down and unload without a sudden release.
- With the head supported, establish a manageable arm hold above the chest and a controlled trunk position. Check that you can retain the hold with the legs still before adding leg movement.
- Move one leg only as far as the trunk position remains consistent, then return before the next leg. Reduce the leg reach first if the back begins to arch.
- Bring the feet down and remove tension deliberately before sitting up or changing the grip. Choose the unbanded version if the loaded entry or exit cannot be controlled.
If the arms drift behind the head even before a leg moves, the hold itself is too demanding; making the leg task easier does not fix it. Keep the head resting rather than turning this into a crunch. The source’s medical-condition tags do not turn this general movement description into a diagnosis or treatment plan.
Standing resistance band wood chop: choose the turn deliberately
A standing resistance band wood chop can use a diagonal high-to-low path with an intended turn. The handled-band High/Low Chop in Bodylastics’ manual, PDF page 117, starts side-on to its high attachment and moves the hands down and across toward the outer leg. That is its system’s example, not a PBGGAME door or connector specification.
- Rehearse a small diagonal movement empty-handed, with room on both sides and a comfortable stance. Do not begin with the maximum turn you can reach.
- For suitable equipment, establish the compatible high attachment and intended grip while unloaded. Keep the complete band path clear as well as the hand path.
- Move down and across through a controllable arc, coordinating the turn rather than yanking with bent elbows or leaning sideways. Allow the feet and hips the adjustment needed for a comfortable turn instead of forcing a knee to remain fixed.
- Reverse along the path under control; do not let the band spin you back. Unload before changing sides and recheck clearance.
Use less demand or a smaller arc if momentum, a large rowing action or a sideways lean replaces the intended movement. Do not force extra spinal rotation to match a photograph. If the unloaded turn is painful, leave it out rather than adding tension to push through it.
A cable chop and medicine-ball chop are separate examples
ACE’s standing rotational chop actually describes a shoulder-height cable and handle, with coordinated weight transfer and torso movement. Its Bands/Cables category label is not a high-band-anchor instruction. The line of pull and resistance system differ from the high-to-low band example.
ACE’s medicine-ball wood chop also teaches distinct stages: the earlier arm movement and later coordinated turning stages are different tasks. Do not combine an instruction to remain facing forward from one stage with a command to rotate from another. Establish which version you intend before selecting its range or load.
Make the next practice comparable
| What changes first? | A useful first adjustment | Record next time |
|---|---|---|
| Torso turns during a Pallof press | Less tension or a shorter reach | Side, band identity, attachment and reach |
| Back arch increases during a dead bug | Shorter, slower limb movement | Version, knee bend and controlled reach |
| Arms drift during the held-band version | Re-establish a manageable hold before moving a leg | Band arrangement and hand position |
| Chop becomes a jerk or sideways lean | Smaller deliberate arc with less demand | Exact chop version, range and body turn |
Start with one task and a light, brief rehearsal you can repeat. Choose work and rest within your wider program and current ability; a long hold is optional and all the versions above are not required in one session. Add another task for a clear purpose once the first setup is manageable. Stop for pain, dizziness, numbness or an unexpected loss of control.
Belly fat is not a separate core-exercise target
Belly fat queries often lead to exercise lists that promise a local result. ACE’s spot-reduction explanation distinguishes training a selected muscle from removing the fat over it. A band abdominal exercise does not establish targeted fat loss or a guaranteed waist-size change.
Use these movements to practise their control tasks. This guide is not a diet, a body-shape promise or a back-pain rehabilitation plan. There is no requirement to train through discomfort or to progress to a particular device to make core practice worthwhile.
Resistance band core exercises PDF: cues and a setup log
Download the core-control cue and record sheet for the main task distinctions, bodyweight versus held-band dead-bug reminder and space to note your setup. The printable PDF links to the source instructions and makes no equipment-compatibility or individualized treatment claim.
A floor-support option and a separate core tool
The blue folding TPE mat includes a storage bag. Its source-listed size is 182.9 × 80 × 0.8 cm and its listed packed mass is 1,175 g. Choose an appropriate clear floor and check the mat’s own use instructions; dimensions alone do not guarantee grip on every surface. No band, anchor or wheel is included.
Explore the black spring-return ab wheel for a separately taught rollout practice. Its listed packed mass is 1,300 g. Follow the model's forward-arrow direction, L/R handle markings, surface requirements and controlled return instructions, and choose a manageable range for your current ability.
These are catalog format examples, not products we claim to have exercise-tested. The folding mat is not presented as an approved rolling track for that wheel. For elastic work, the band format guide helps identify the construction before you choose the exercise.