Pilates at Home: A Small-Ball and Band Core Session
Choose and set up a mini Pilates ball, learn supported ball and light-band movements, and build a short home session with comfortable transitions.
For Pilates at home, choose a few mat movements you can perform comfortably, then add a small ball or light loop only where it has a clear job. A ball can give your hands or thighs a contact cue; a loop can resist the thighs moving apart. Neither prop needs to appear in every exercise.
Start with a supported position, normal breathing and a deliberate return. This guide combines mini Pilates ball exercises, equipment setup, simple band control and an adjustable ten-minute example. It is Pilates-inspired general movement practice, rather than a reformer lesson or an individual rehabilitation programme.
Go to the task you need today
| Question | Start here |
|---|---|
| Choose a ball / placement | Mini-ball selection |
| Inflate the actual fitting | Model-specific inflation |
| A ball repeatedly softens | Unload before checking |
| Learn a movement | Hips-down squeeze, bridge, supported curl-up, hand-to-knee contact or seated contact |
| Use a permitted light loop | Band placement and return |
| Organize a familiar short session | Ten-minute example |
| Task role | Ball choice | Band or no-prop choice |
|---|---|---|
| Supported thigh contact | Light inward-pressure cue with hips down | A loop opening task is different; use only the taught role |
| Familiar bridge | Light ball contact as a separate cue | Plain bridge or permitted light loop are alternatives, not layers to combine |
| Trunk-control practice | Light opposite hand-to-knee contact | Unbanded heel-slide or a suitable already-taught no-prop option |
Choose two or three familiar tasks, not the entire library. The ten-minute template includes transitions and rest; pause it when placement or recovery needs longer. One prop format at a time is enough.
Choose a mini Pilates ball for its placement
A mini Pilates ball is a small compressible exercise prop. It differs from a large stability ball used for sitting or balancing. A large-ball height chart does not tell you which mini Pilates ball size will fit between your thighs, in your hands or behind the mid-back for a taught exercise.
Real models vary considerably. Balanced Body's small inflatable ball is listed as four inches or ten centimetres and uses a needle pump for later inflation. Merrithew's Mini Stability Ball guide lists nineteen, twenty-five and thirty-centimetre models; its separate inflation sheet documents a straw-and-plug system. Those examples show why Pilates ball sizes and fittings must be checked model by model.
| Placement | Fit to look for | Reassess if |
|---|---|---|
| Between the hands | Relaxed elbows and comfortable palm contact near the chest. | The ball crowds the face or forces the arms wide. |
| Between the lower thighs | Contact above the knee joints with feet comfortably supported. | The ball forces the knees apart or makes the feet roll. |
| Behind the mid-back | The exact placement taught for the exercise and controllable entry/exit. | You need to brace through the neck or the ball shifts. |
The best ball for the placement is one you can control without forcing your body around it. Diameter and firmness answer different questions. A much larger ball partly deflated is not automatically equivalent to a smaller model; folds and contact shape can change. Use the diameter recommended by the lesson or maker, then adjust firmness only as that model allows.
If you attend a class, ask which ball the teacher uses and whether yours is suitable. Before buying, check diameter, inflation method, permitted placements, care and replacement parts. For a ball already in your hands, test the placement with the rest of the body supported before adding movement.
How to inflate a Pilates ball
Identify the valve first. A straw-and-plug mini ball and a needle-valve model need different tools. Do not force a sports-ball needle into an open straw fitting or a straw into a needle valve. Have the correct plug ready before adding air.
Merrithew's inflation sheet shows its straw, plug and removal tool, including the handover that limits escaping air. For a matching straw-and-plug system:
- Work on a clean dry surface. Inspect the ball, opening and supplied parts, keeping small loose parts away from children and pets.
- Remove the plug by the supplied method, then insert the correct straw as instructed.
- Add air gradually to the firmness and any diameter limit specified for that model. Avoid an as-hard-as-possible target.
- Cover the straw while preparing the changeover. Withdraw it and promptly cover the opening with a clean finger without squeezing the ball flat.
- Insert the matching plug fully as directed. Apply a gentle hand press and check that the seal and firmness remain consistent before exercise.
There is no universal Pilates ball inflation pressure in PSI here. The Gaiam Mini Ab Ball care sheet warns against overinflating its model and asks users to let it reach room temperature first. Follow your own instructions, without using a heater or hot water to speed the process. Keep the straw, plug tool and model information together for the next setup.
Pilates ball losing air: unload it before checking
Air escaping while you exchange the straw for the plug is different from a sealed ball that repeatedly softens. Compression under a gentle squeeze is also normal for many mini balls; it does not by itself prove a leak. Note when the change occurs instead of immediately adding more air.
| Observation | Next step |
|---|---|
| Air escapes during changeover. | Prepare the plug beside your hand and repeat the documented handover. |
| The mini Pilates ball plug is missing or will not seat. | Confirm the exact fitting and ask the maker about a matching replacement. |
| A cut, tear or damaged opening is visible. | Take the ball out of use. |
| The Pilates ball keeps deflating after correct sealing. | Contact the maker with the model and sequence; use another exercise meanwhile. |
Inspect the unloaded plug, opening and whole surface in good light. Do not trim or hammer a plug, wrap it in tape, add glue or probe the opening with a needle. Avoid soaking or household leak-testing chemicals unless the maker permits them. A suspect ball should leave the session entirely, especially beneath the torso; repeated top-ups do not establish dependable support.
Mini ball inner-thigh squeeze: keep the hips down
Lie on your back with knees bent, both feet supported and arms resting. Put a suitable soft ball against the fleshy lower thighs just above the knees. Check comfortable knee and foot alignment, then gradually apply light inward pressure and ease it off while the hips remain on the mat.
Unite Health's mini-ball sequence introduces a gradual squeeze before adding a bridge, rather than starting with maximum effort. You can keep that preparation as its own exercise. Breathe normally and hold only briefly; the release should be as controlled as the press.
For this Pilates ball squeeze between the knees, quiet feet and pelvis matter more than crushing the prop. If a foot rolls, the hips lift or the ball moves toward the body, release and reassess placement and size. If contact feels uncomfortable at the joints, remove the ball. This supported squeeze is separate from a hip lift or leg raise.
Mini Pilates ball bridge: add a controlled hip lift
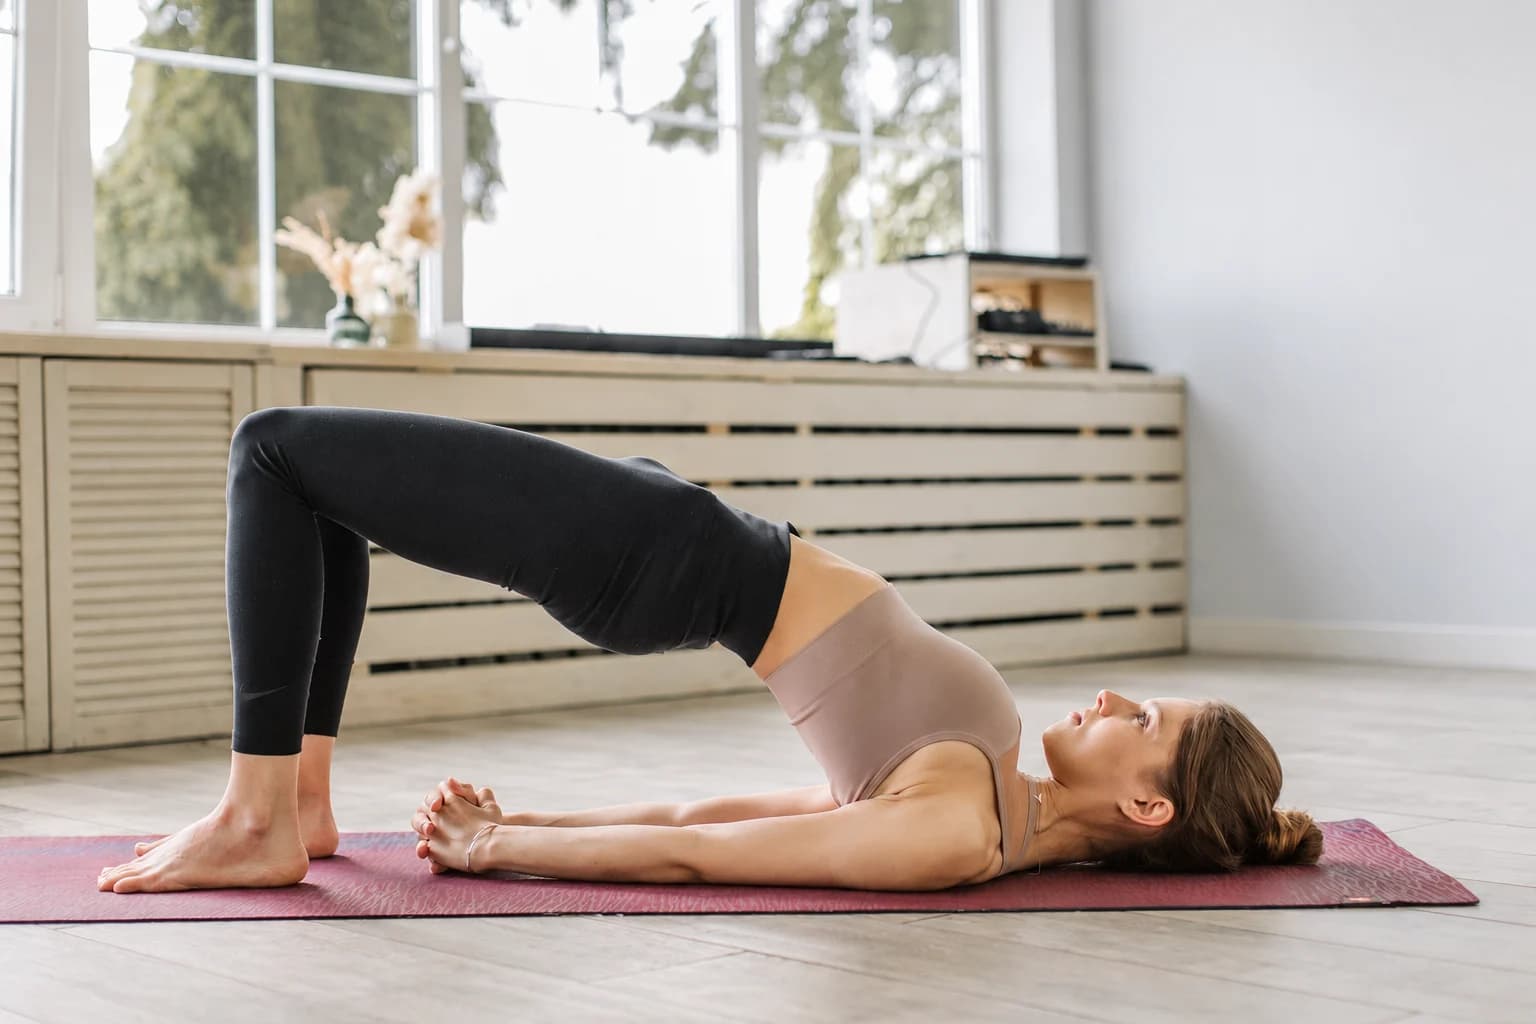
First rehearse a comfortable bridge without a prop. Then set the same supported starting position with light ball contact between the lower thighs. The bridge with a ball between the knees adds hip movement to the squeeze; the feet remain on the floor.
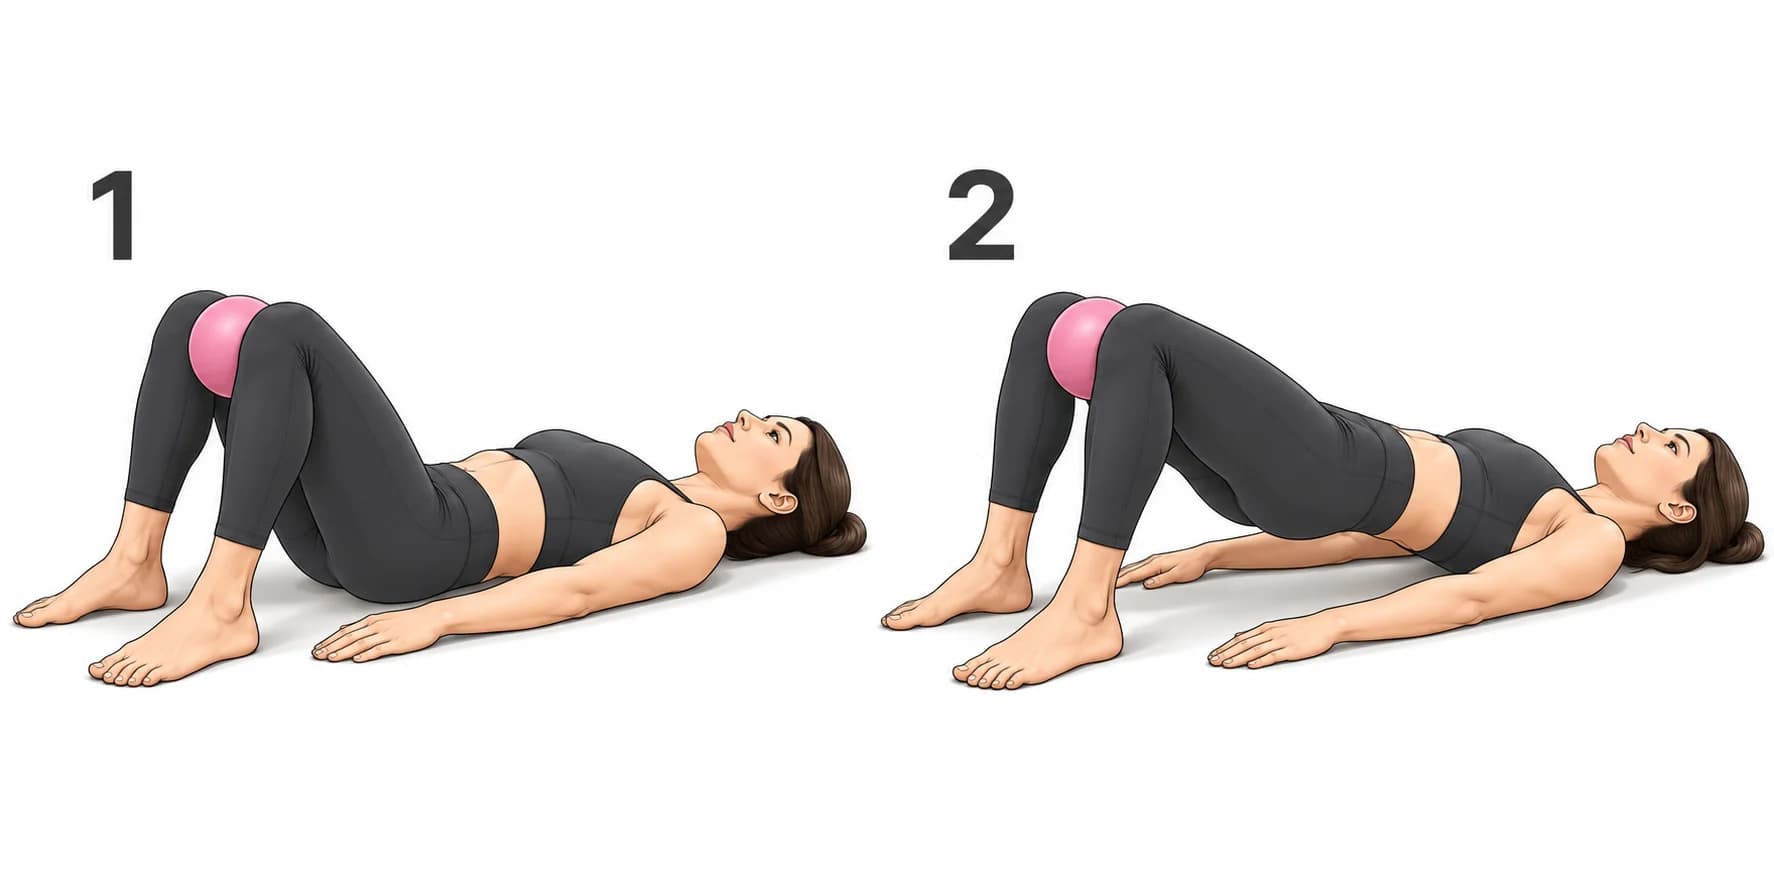
- Settle the head, shoulders and both feet. Keep the ball still with light pressure.
- Lift the hips smoothly to a comfortable height while continuing to breathe.
- Stop before the ribs flare, the back arches strongly or weight shifts toward the neck.
- Lower until the pelvis rests, soften unnecessary thigh tension and reset before repeating.
NASM's floor-bridge instructions establish the base hip lift and controlled lowering; the ball adds a separate light-contact task. Different lessons use different spinal sequencing, so follow one coherent method. This version emphasises a modest comfortable hip lift, not maximum height or a maximum squeeze. Lower before looking around or repositioning the ball; keep the head resting rather than pushing through it.
Mini Pilates ball curl-up: mid-back support needs its own setup
This mini ball curl-up is the supported Ab Prep format, not a floor crunch holding a ball between the knees. Merrithew's exercise guide places the ball at the mid-back, with bent knees, supported feet and hands supporting the head. It also cautions against excessive neck and shoulder tension.
Use a ball and lesson intended for that placement. Settle into the position deliberately, keeping hands available while entering or leaving. Do not place the ball beneath the skull or neck, or roll around on it searching for a pressure point. If placement is uncertain or the ball will not stay still, leave this option out and ask an instructor.
- With the ball stable at the taught mid-back position, support the head without pulling it forward.
- Keep the feet planted and curl the head and upper torso a small comfortable distance.
- Pause before the neck juts or the ball moves, then return slowly to the supported start.
The published Ab Prep includes travel back over the ball; a smaller initial range is an editorial practice option. Do not chase a deep backward release or a full sit-up. If a familiar floor curl-up is uncomfortable, adding a prop is not the next step. A smaller lift, a no-ball movement already comfortable for you or omitting trunk flexion may better fit the session.
Mini ball dead bug: opposite hand-to-knee contact
For a dead bug ball hand-to-knee press, the ball is a light contact cue while another limb moves. Trideer's mini-ball guide describes opposite hand-and-knee contact with free arm and leg movement. The version below keeps the free arm still and uses a short supported heel path as an editorial simplification.
- Lie on your back and check that a comfortable bent-leg lift is manageable without the ball.
- Bring the left bent knee up and hold the ball between the lower thigh near that knee and the right palm. Keep contact clear of the kneecap.
- Keep the head supported, the free left arm resting and the right foot on the floor. Apply only light steady pressure.
- If the surface allows a comfortable heel movement, slide the right heel a short distance away and back, keeping some knee bend.
- Stop before the pelvis turns, the back position changes markedly or the contact becomes erratic. Release, rest and rebuild the opposite side.
Do not force a heel across a catching surface. Use a smaller comfortable foot movement or practise only the contact. If the ball cannot fit without twisting or pulling the knee sharply inward, remove it. You do not need a long straight-leg extension or the free arm overhead to practise keeping the trunk steady.
Seated mini ball rotation and a light palm press
Sit upright on a firm chair without wheels, feet supported, or use a comfortable floor position with bent knees and planted feet. Keep the ball between your palms near the chest, clear of the chin. Do not sit on it.
Try a light palm press and release while facing forward. For the Pilates mini ball seated press, elbows and shoulders should remain relaxed. Then turn the chest through a small comfortable range, let the gaze follow and bring the ball with the torso. Return to centre and pause before the other side.
This grounded-foot seated mini ball rotation is an editorial adaptation. It differs from Trideer's backward-leaning, raised-foot twist and Merrithew's rotations with the ball behind the torso. Keep those setups separate. Stop the turn before a foot lifts, the pelvis shifts or the arms swing ahead of the chest. Shorten it or practise without the ball if the light press becomes whole-body straining.
Pilates with bands: control the return
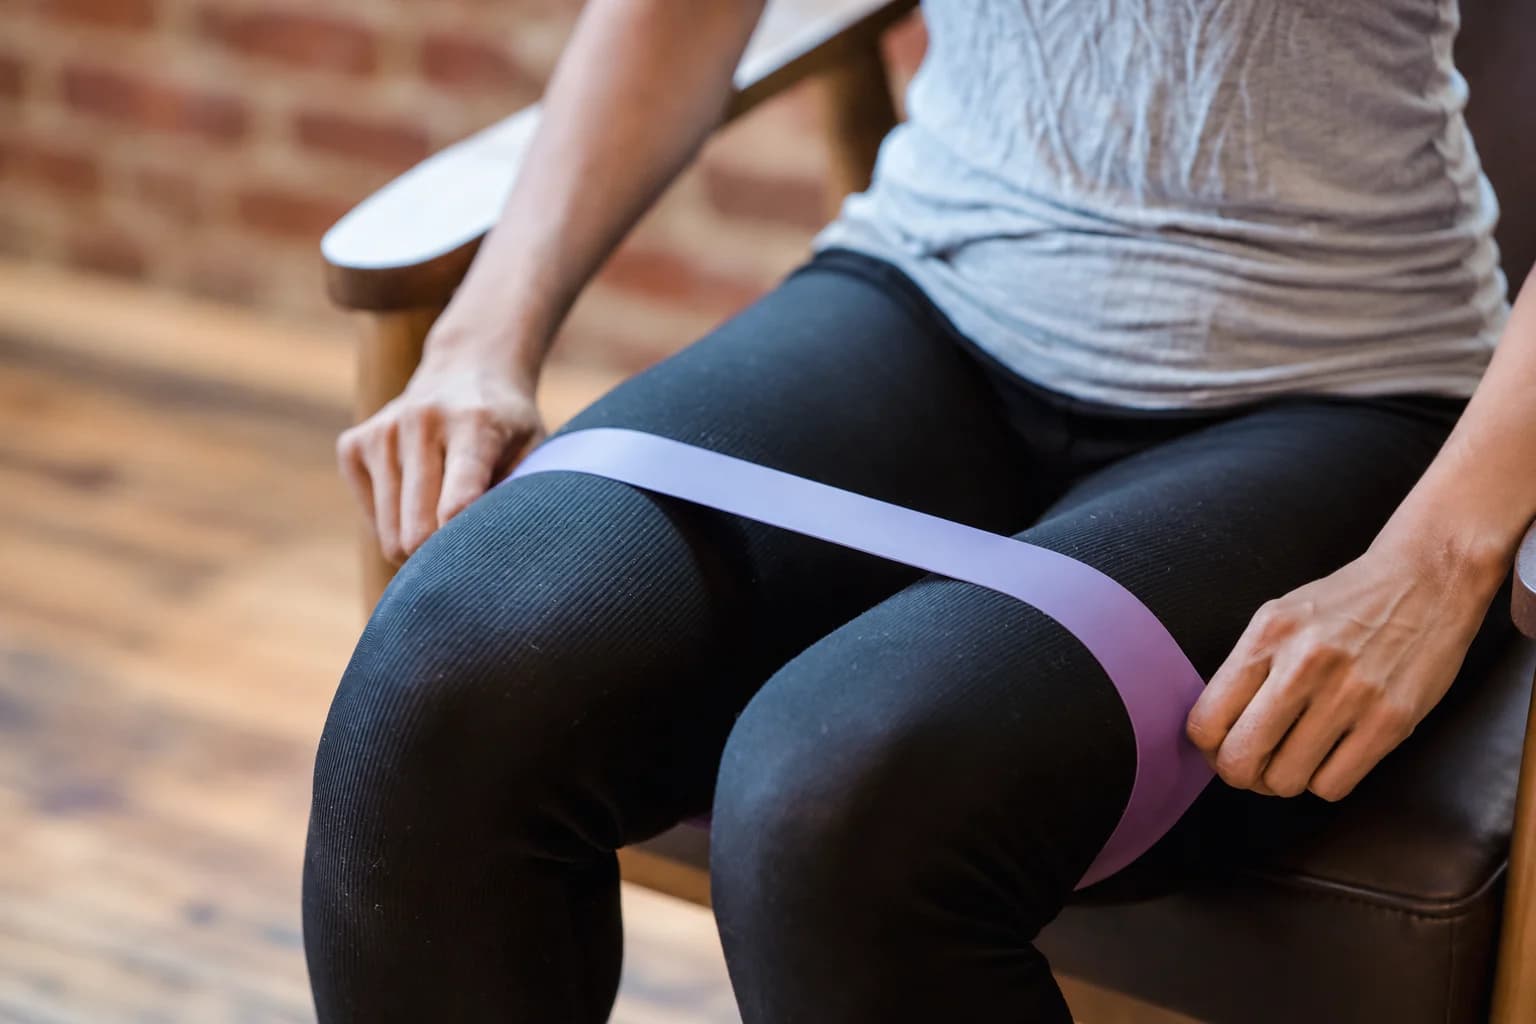
Begin Pilates with resistance bands using a light loop only where you can keep a comfortable position. A mini loop above the knees resists the thighs moving apart. A ball between the thighs gives an inward-pressure task. They are different choices, so do not combine both simply to add equipment.
Check the band's design, allowed placement, condition and stretch limit. Performance Health's THERABAND guidance illustrates why format and model-specific levels matter. Long stretch bands, mini loops and X-shaped reformer-style systems are not interchangeable. A flat elastic exercise band is equipment, rather than adhesive sports tape. For wider format choices, use the portable resistance band kit guide.
For Pilates with resistance bands for beginners, first rehearse a side-lying clam without a loop. Bend the knees, stack the hips and support the head comfortably. Keep the heels together, lift the top knee a little without rolling the pelvis backward, then lower it slowly. If that stays manageable and the maker allows the placement, use a light loop above the knees for the same small movement.
Keep the loop flat and clear of the knee joint. Rolling, pinching or pressure that changes your position calls for removing it. A heavier loop is not needed to make the practice worthwhile. Use only as much opening as you can reverse smoothly while breathing. Repeat the setup on the other side, rather than twisting against the loop to change position.
For another Pilates band exercise, an ordinary bridge can use a permitted light loop above the knees. Maintain comfortable knee spacing rather than pressing as far outward as possible. Lift and lower with the feet supported, then remove the loop before another task. This is an alternative to the ball bridge, not an instruction to use both at once.
Keep other exercises unbanded. Try small arm reaches and heel slides lying on your back, or remove the loop for a short side-lying leg lift with the top leg following the body line. Stop before you arch or roll. A useful Pilates band workout lets you control both the outward movement and the return; a snap back or a held breath calls for less resistance or a simpler version.
Choose a clear mat area
Leave room for the arm and leg paths, side-to-side transitions and a comfortable route on and off the floor. Use a mat that stays flat on your actual surface. Keep the ball from rolling into a walkway, and keep loose plugs and inflation tools outside the movement area. If floor access or a planned position is difficult, choose a familiar accessible activity or individual instruction.
Create a dedicated practice space with the PBGGAME Blue cross-fold travel mat. Its folding format and storage bag make it a practical option for home sessions or a packed training setup. Compare the listed dimensions with your practice space and unfold it flat before use, then add the ball or band selected for the exercises below.
A ten-minute Pilates ball or band session
Choose two or three familiar movement tasks, not every option above. The following ten-minute Pilates resistance-band session example also works as an organisational template for the ball choices. Use one prop format at a time; pause the clock whenever you need longer for rest, placement or transitions. The timing organises practice rather than setting a required dose.
| Time | Choose a manageable task | What to keep steady |
|---|---|---|
| 0-2 minutes | Comfortable breathing, small reaches and unbanded heel slides. | Head supported, ribs and pelvis comfortable. |
| 2-4 minutes | Light ball squeeze, or a few clams each side with an optional light loop. | Gradual pressure or opening; deliberate release. |
| 4-6 minutes | A familiar bridge: plain, light ball contact, or a permitted light loop. | Feet supported, modest hip lift, full lowering. |
| 6-8 minutes | Short dead-bug contact and foot movement, or an unbanded heel-slide task. | Quiet trunk and an easy return. |
| 8-10 minutes | Rest, comfortable seated palm contact or a familiar small turn; finish unbanded. | Feet grounded and unrushed exit. |
For count-based practice, a first pass might use four gradual squeezes, four comfortable bridges and three short foot movements per side, with rest between them. These are optional observation samples. The curl-up can remain a separately learned skill instead of another timed station. If the final repetition no longer resembles the first, end that task.
Small Pilates ball exercises can include leg-pressure control, hip movement and trunk work without all becoming a Pilates ball abs workout. If you want gentle Pilates ball stretches, choose a separately taught comfortable stretch instead of forcing a longer squeeze, deeper bridge or backward bend. A small prop does not make every range appropriate.
Repeat a useful setup before making it harder
After the first round, put the equipment down. Ask whether breathing remained easy, contacts stayed predictable and each movement returned deliberately. You may finish there. A second small round belongs only when you can reproduce the same setup comfortably, rather than because the clock or a streak says to continue.
Record the ball model and firmness or band choice, placement, exercises and comfortable counts. Later change one feature: one repetition, a little range or a smoother pause. Harder squeezing, stronger bands and less rest are not automatic progress. This mini-ball workout and band sequence are parts of a wider activity routine, not a complete replacement for every strength, balance or aerobic goal.
Stop for pain, numbness, dizziness or unusual difficulty breathing. If a condition or recent injury affects exercise choice, get individual guidance rather than using the prop to work through symptoms. Follow each item's cleaning and storage instructions; let it dry and keep it away from sharp objects, excessive heat and direct sun as directed.